Mostrando entradas con la etiqueta Backup and Restore. Mostrar todas las entradas
Mostrando entradas con la etiqueta Backup and Restore. Mostrar todas las entradas
sábado, 18 de mayo de 2013


Zimbra Backup - Restore Single Mailbox from full backup
Spanish Keywords: Restaurar desde un backup completo de Zimbra un único buzón
Fuente: http://www.zimbra.com/forums/administrators/10525-how-restore-single-email-oss-version.html
$ su zimbra
zimbra $ zmprov getMailboxInfo user@domain.com
mailboxId: 4
quotaUsed: 826113308
El id es 4 y tiene un tamaño de 787MB aprox (está desplegado en bytes)
ok still having some issues with how zmlmtpinject works
maybe someone can help me with syntax.
the message i want to inject is /opt/zimbra/store/0/5/msg/258-4.msg
the place i want for it to go is /opt/zimbra/store/0/5/msg/0/
the username for the directory is mattj@example.com
zmlmtpinject -r mattj@example.com -s sender@example.com /opt/zimbra/store/0/5/msg/258-4.msg
zmlmtpinject -r mattj@example.com -s sender@example.com -d /path/to/direcory
Fuente: http://www.zimbra.com/forums/administrators/10525-how-restore-single-email-oss-version.html
$ su zimbra
zimbra $ zmprov getMailboxInfo user@domain.com
mailboxId: 4
quotaUsed: 826113308
El id es 4 y tiene un tamaño de 787MB aprox (está desplegado en bytes)
maybe someone can help me with syntax.
the message i want to inject is /opt/zimbra/store/0/5/msg/258-4.msg
the place i want for it to go is /opt/zimbra/store/0/5/msg/0/
the username for the directory is mattj@example.com
zmlmtpinject -r mattj@example.com -s sender@example.com /opt/zimbra/store/0/5/msg/258-4.msg
zmlmtpinject -r mattj@example.com -s sender@example.com -d /path/to/direcory
jueves, 11 de octubre de 2012
'Error E1AD3212: You do not have sufficient privileges to perform this operation.' is seen following successful installation of Symantec System Recovery 2011 (SSR2011)
Spanish Keywords: "Error E1AD3212: No tiene los privilegios necesarios para realizar esta operación" se despliega después de un mensaje de instalación completa de Symantec System Recovery 2011 (SSR2011)
Fuente: http://www.symantec.com/business/support/index?page=content&id=TECH171216
Event ID: 100
Description:
Result (0xebab0005 18 ERROR_ERRORS_EXIST Args [2] Arg (0xbab0012 Result (0xec8f1775 16 VPRO_ERROR_START Args [2] Arg (0xbab000d 24 Symantec System Recovery) Arg (0xbab0012 Result (0xec8f1772 26 VPRO_ERROR_COMPONENT_SETUP Args [1] Arg (0xbab000d 24 Symantec.SpnRegistration);));)) Arg (0xbab0012 Result (0xebab03f1 14 ERROR_OS_ERROR Args [1] Arg (0xbab000d 21 Invalid class string.);));)
REGSVR32 ":\Program Files (x86)\Symantec\Symantec System Recovery\Agent\spnregister.dll"
336887
Fuente: http://www.symantec.com/business/support/index?page=content&id=TECH171216
Problem
'Error E1AD3212: You do not have sufficient privileges to perform this operation.' is seen following successful installation of Symantec System Recovery 2011 (SSR2011). In addition, an EventID: 100 is recorded in the Application Log.
Error
Error E1AD3212: You do not have sufficient privileges to perform this operation.
Also receive:
Event ID: 100
Description:
Result (0xebab0005 18 ERROR_ERRORS_EXIST Args [2] Arg (0xbab0012 Result (0xec8f1775 16 VPRO_ERROR_START Args [2] Arg (0xbab000d 24 Symantec System Recovery) Arg (0xbab0012 Result (0xec8f1772 26 VPRO_ERROR_COMPONENT_SETUP Args [1] Arg (0xbab000d 24 Symantec.SpnRegistration);));)) Arg (0xbab0012 Result (0xebab03f1 14 ERROR_OS_ERROR Args [1] Arg (0xbab000d 21 Invalid class string.);));)
Solution
Following a successful installation of Symantec System Recovery 2011 and server restart, clicking on next during the welcome wizard causes the E1AD3212 to appear (Figure 1).
Figure 1:

Solution:
Figure 1:
Solution:
Manually register SPNREGISTER.DLL using the following command:
1. On a 64 bit Operating System
REGSVR32 "
2. On a 32 bit Operating System
REGSVR32 ":\Program Files\Symantec\Symantec System Recovery\Agent\spnregister.dll"
Legacy ID
336887
Article URL http://www.symantec.com/docs/TECH171216
Terms of use for this information are found in Legal Notices
Error when performing an action on a client computer in the Backup Exec System Recovery 2010/Symantec System Recovery 2011: "Retrieving the COM class factory for component with CLSID xxxx-xxxx-xxxx-xxxx failed due to the following error: 80040154."
Spanish Keywords: Error cuando se realiza una acción en un computador cliente con Backup Exec System Recovery 2010 y Symantec System Recovery 2011: "Retrieving the COM class factory for component with CLSID xxxx-xxxx-xxxx-xxxx failed due to the following error: 80040154."
Fuente: http://www.symantec.com/business/support/index?page=content&id=TECH61241
Problem

Fuente: http://www.symantec.com/business/support/index?page=content&id=TECH61241
Problem
Error when performing an action on a client computer in the Backup Exec System Recovery 2010/Symantec System Recovery 2011: "Retrieving the COM class factory for component with CLSID xxxx-xxxx-xxxx-xxxx failed due to the following error: 80040154."
Error
Unable to load configuration information. Retrieving the COM class factory for component with CLSID {xxxx-xxxx-xxxx-xxxx}) failed due to the following error: 80040154
Cause
When selecting a client computer or performing an action in the Backup Exec System Recovery 2010/Symantec System Recovery 2011, the following error is displayed (Figure 1). The error is the result of one or more DLL files not being registered successfully. The number displayed after CLSID will vary depending on which DLL is not properly registered and what action is being performed:
Figure 1
Solution
To correct this problem, the DLL files can be manually registered:
1. Open a Command Prompt by going to Start > Run, type CMD, and click OK.
2. Type C: and press ENTER
3. Change to the correct directory by typing the following and pressing ENTER:
On a 32-bit system:
CD "\Program Files\Common Files\Symantec Shared\VProRecovery"
On a 64-bit system:
CD "\Program Files (x86)\Common Files\Symantec Shared\VProRecovery"
4. Type the following commands and press ENTER after each one. A confirmation windows should appear after each command is entered. Press OK to close the confirmation:
regsvr32 ComConfig.dll
regsvr32 EventMonitors.dll
regsvr32 NotifyHandler.dll
regsvr32 VProAuto.dll
regsvr32 VProObj.dll
regsvr32 VProScheduler.dll
After performing these steps, restart the Backup Exec System Recovery 2010/Symantec System Recovery 2011 and try the failing operation again.
For Windows 2008 and above operating systems
1. Right click the respective .dll file.
2. Select "Open with"
3. Browse to "C:\Windows\System32
4. Select "regsvr32.exe"
5. Click on "Open" and the .dll file will get re-registered
1. Open a Command Prompt by going to Start > Run, type CMD, and click OK.
2. Type C: and press ENTER
3. Change to the correct directory by typing the following and pressing ENTER:
On a 32-bit system:
CD "\Program Files\Common Files\Symantec Shared\VProRecovery"
On a 64-bit system:
CD "\Program Files (x86)\Common Files\Symantec Shared\VProRecovery"
4. Type the following commands and press ENTER after each one. A confirmation windows should appear after each command is entered. Press OK to close the confirmation:
regsvr32 ComConfig.dll
regsvr32 EventMonitors.dll
regsvr32 NotifyHandler.dll
regsvr32 VProAuto.dll
regsvr32 VProObj.dll
regsvr32 VProScheduler.dll
After performing these steps, restart the Backup Exec System Recovery 2010/Symantec System Recovery 2011 and try the failing operation again.
For Windows 2008 and above operating systems
1. Right click the respective .dll file.
2. Select "Open with"
3. Browse to "C:\Windows\System32
4. Select "regsvr32.exe"
5. Click on "Open" and the .dll file will get re-registered
martes, 4 de septiembre de 2012
Zimbra 7 Failed to start slapd bdb_db_close: database "": txn_checkpoint failed: Invalid argument (22).
Problema provocado por apagados bruscos o incorrectos de zimbra. USEN UN UPS Y APRENDAN A APAGAR SU SERVIDOR! !!!!!!!
Y sino tengan un backup que funcione.....
login as: root
root@mail.dominio.com's password:
Last login: Tue Sep 4 15:01:41 2012 from mail.infa.gob.ec
[root@mail zimbra]# su zimbra
[zimbra@mail ~]$ zmcontrol start
Host mail.dominio.com
Starting ldap...Done.
Failed.
Failed to start slapd. Attempting debug start to determine error.
bdb_db_close: database "": txn_checkpoint failed: Invalid argument (22).
backend_startup_one (type=hdb, suffix=""): bi_db_open failed! (22)
bdb_db_close: database "": alock_close failed
[zimbra@mail ~]$ zmcontrol stop
Host mail.dominio.com
Stopping stats...Done.
Stopping mta...Done.
Stopping spell...Done.
Stopping snmp...Done.
Stopping cbpolicyd...Done.
Stopping archiving...Done.
Stopping antivirus...Done.
Stopping antispam...Done.
Stopping imapproxy...Done.
Stopping memcached...Done.
Stopping mailbox...Done.
Stopping logger...Done.
Stopping zmconfigd...Done.
Stopping ldap...Done.
[zimbra@mail ~]$ cd /
[zimbra@mail /]$ cd opt
[zimbra@mail opt]$ cd zimbra
[zimbra@mail ~]$ cd data
[zimbra@mail data]$ cd ldap
[zimbra@mail ldap]$ cd hdb
[zimbra@mail hdb]$ cd db
[zimbra@mail db]$ ls
alock dn2id.bdb zimbraDomainName.bdb
cn.bdb entryCSN.bdb zimbraForeignPrincipal.bdb
__db.001 entryUUID.bdb zimbraId.bdb
__db.002 givenName.bdb zimbraMailAlias.bdb
__db.003 id2entry.bdb zimbraMailCatchAllAddress.bdb
__db.004 mail.bdb zimbraMailDeliveryAddress.bdb
__db.005 objectClass.bdb zimbraMailForwardingAddress.bdb
__db.006 sn.bdb zimbraMailHost.bdb
DB_CONFIG uid.bdb zimbraMailTransport.bdb
displayName.bdb zimbraACE.bdb zimbraVirtualHostname.bdb
[zimbra@mail db]$ /opt/zimbra/bdb (aquí hay doble tab para ver la versión)
bdb/ bdb-4.7.25.4/
[zimbra@mail db]$ /opt/zimbra/bdb-4.7.25.4/bin/db_recover -vv
Finding last valid log LSN: file: 47 offset 4632342
Recovery starting from [47][4632197]
Recovery complete at Tue Sep 4 16:36:33 2012
Maximum transaction ID 80000002 Recovery checkpoint [47][4632342]
[zimbra@mail db]$ ls (noten los db.000x eliminados automáticamente)
alock id2entry.bdb zimbraId.bdb
cn.bdb mail.bdb zimbraMailAlias.bdb
DB_CONFIG objectClass.bdb zimbraMailCatchAllAddress.bdb
displayName.bdb sn.bdb zimbraMailDeliveryAddress.bdb
dn2id.bdb uid.bdb zimbraMailForwardingAddress.bdb
entryCSN.bdb zimbraACE.bdb zimbraMailHost.bdb
entryUUID.bdb zimbraDomainName.bdb zimbraMailTransport.bdb
givenName.bdb zimbraForeignPrincipal.bdb zimbraVirtualHostname.bdb
[zimbra@mail ldap]$ cd /
[zimbra@mail /]$ zmcontrol start
Host mail.dominio.com
Starting ldap...Done.
Starting zmconfigd...Done.
Starting logger...Done.
Starting mailbox...Done.
Starting spell...Done.
Starting mta...Done.
Starting stats...Done.
[zimbra@mail /]$ zmcontrol status
Host mail.dominio.com
ldap Running
logger Running
mailbox Running
mta Running
spell Running
stats Running
zmconfigd Running
Otras fuentes: http://www.ecualug.org/2010/03/15/forums/problemas_con_zimbra
Y sino tengan un backup que funcione.....
login as: root
root@mail.dominio.com's password:
Last login: Tue Sep 4 15:01:41 2012 from mail.infa.gob.ec
[root@mail zimbra]# su zimbra
[zimbra@mail ~]$ zmcontrol start
Host mail.dominio.com
Starting ldap...Done.
Failed.
Failed to start slapd. Attempting debug start to determine error.
bdb_db_close: database "": txn_checkpoint failed: Invalid argument (22).
backend_startup_one (type=hdb, suffix=""): bi_db_open failed! (22)
bdb_db_close: database "": alock_close failed
[zimbra@mail ~]$ zmcontrol stop
Host mail.dominio.com
Stopping stats...Done.
Stopping mta...Done.
Stopping spell...Done.
Stopping snmp...Done.
Stopping cbpolicyd...Done.
Stopping archiving...Done.
Stopping antivirus...Done.
Stopping antispam...Done.
Stopping imapproxy...Done.
Stopping memcached...Done.
Stopping mailbox...Done.
Stopping logger...Done.
Stopping zmconfigd...Done.
Stopping ldap...Done.
[zimbra@mail ~]$ cd /
[zimbra@mail /]$ cd opt
[zimbra@mail opt]$ cd zimbra
[zimbra@mail ~]$ cd data
[zimbra@mail data]$ cd ldap
[zimbra@mail ldap]$ cd hdb
[zimbra@mail hdb]$ cd db
[zimbra@mail db]$ ls
alock dn2id.bdb zimbraDomainName.bdb
cn.bdb entryCSN.bdb zimbraForeignPrincipal.bdb
__db.001 entryUUID.bdb zimbraId.bdb
__db.002 givenName.bdb zimbraMailAlias.bdb
__db.003 id2entry.bdb zimbraMailCatchAllAddress.bdb
__db.004 mail.bdb zimbraMailDeliveryAddress.bdb
__db.005 objectClass.bdb zimbraMailForwardingAddress.bdb
__db.006 sn.bdb zimbraMailHost.bdb
DB_CONFIG uid.bdb zimbraMailTransport.bdb
displayName.bdb zimbraACE.bdb zimbraVirtualHostname.bdb
[zimbra@mail db]$ /opt/zimbra/bdb (aquí hay doble tab para ver la versión)
bdb/ bdb-4.7.25.4/
[zimbra@mail db]$ /opt/zimbra/bdb-4.7.25.4/bin/db_recover -vv
Finding last valid log LSN: file: 47 offset 4632342
Recovery starting from [47][4632197]
Recovery complete at Tue Sep 4 16:36:33 2012
Maximum transaction ID 80000002 Recovery checkpoint [47][4632342]
[zimbra@mail db]$ ls (noten los db.000x eliminados automáticamente)
alock id2entry.bdb zimbraId.bdb
cn.bdb mail.bdb zimbraMailAlias.bdb
DB_CONFIG objectClass.bdb zimbraMailCatchAllAddress.bdb
displayName.bdb sn.bdb zimbraMailDeliveryAddress.bdb
dn2id.bdb uid.bdb zimbraMailForwardingAddress.bdb
entryCSN.bdb zimbraACE.bdb zimbraMailHost.bdb
entryUUID.bdb zimbraDomainName.bdb zimbraMailTransport.bdb
givenName.bdb zimbraForeignPrincipal.bdb zimbraVirtualHostname.bdb
[zimbra@mail ldap]$ cd /
[zimbra@mail /]$ zmcontrol start
Host mail.dominio.com
Starting ldap...Done.
Starting zmconfigd...Done.
Starting logger...Done.
Starting mailbox...Done.
Starting spell...Done.
Starting mta...Done.
Starting stats...Done.
[zimbra@mail /]$ zmcontrol status
Host mail.dominio.com
ldap Running
logger Running
mailbox Running
mta Running
spell Running
stats Running
zmconfigd Running
Otras fuentes: http://www.ecualug.org/2010/03/15/forums/problemas_con_zimbra
miércoles, 8 de agosto de 2012
How to backup System State in Windows Server 2008R2?
Spanish Keywords: Cómo realizar un respaldo del Estado del Sistema en Windows Server 2008 R2
Tested on win2k8 r2
- First install Windows Backup Tools and Command Line Tools
- Control Panel - Add Windows Features
- Start cmd.exe as administrator
Run
To restore:
Get version to restore:
Tested on win2k8 r2
- First install Windows Backup Tools and Command Line Tools
- Control Panel - Add Windows Features
- Start cmd.exe as administrator
Run
- wbadmin start systemstatebackup -backupTarget:VolumeName
- wbadmin start systemstatebackup -backupTarget:\\192.168.1.6\Backups\DC
To restore:
Get version to restore:
- wbadmin get versions
Later
wbadmin start systemstaterecovery –version:backupversion -backupTarget:\\192.168.1.6\Backups\DCjueves, 23 de febrero de 2012
Montar unidades windows en linux : samba
Fuente:http://dieguz2.blogspot.com/2007/04/montar-unidades-windows-en-linux-samba.html
Montar unidades windows en linux : samba
¿Cómo puedo hacer para ver un directorio de una maquina de windows?
Para poder montar una "carpeta compartida" de windows en nuestro suse 10.2 debemos utilizar el siguiente comando:
mount -t cifs -o user=USUARIOWINDOWS,password=CONTRASEÑAWINDOWS //IPdelOrdenadorRemoto/Recurso/ /RUTADONDEMONTAR
si se usa el comando mount -t smbfs saldrá el siguiente mensaje de error: mount: tipo de sistema de ficheros 'smbfs' desconocido
Ejemplo: montar de la máquina windows con ip 192.168.1.6 el directorio compartido música.
No tiene contraseña.
mount -t cifs -o password= //192.168.1.6/musica /mnt/musica/
Nota: si no ponemos password= nos pedirá la contraseña
Para montar automáticamente las unidades tenemos que añadir las siguiente linea al archivo fstab
1) vi /etc/fstab
2) añadir //192.168.1.6/musica /mnt/musica cifs defaults,user='guest',password='' 0 0
Si usamos el comando mount y nos saliese el mensaje de error:
"tipo de sistema de ficheros 'cifs' desconocido" es probable que nos falte alguno de estos paquetes: smbget y/o samba .
Los instalaremos desde el yast, zypper o apt-get (en caso de otros linux que lo incorporen).
Montar unidades windows en linux : samba
¿Cómo puedo hacer para ver un directorio de una maquina de windows?
Para poder montar una "carpeta compartida" de windows en nuestro suse 10.2 debemos utilizar el siguiente comando:
mount -t cifs -o user=USUARIOWINDOWS,password=CONTRASEÑAWINDOWS //IPdelOrdenadorRemoto/Recurso/ /RUTADONDEMONTAR
si se usa el comando mount -t smbfs saldrá el siguiente mensaje de error: mount: tipo de sistema de ficheros 'smbfs' desconocido
Ejemplo: montar de la máquina windows con ip 192.168.1.6 el directorio compartido música.
No tiene contraseña.
mount -t cifs -o password= //192.168.1.6/musica /mnt/musica/
Nota: si no ponemos password= nos pedirá la contraseña
Para montar automáticamente las unidades tenemos que añadir las siguiente linea al archivo fstab
1) vi /etc/fstab
2) añadir //192.168.1.6/musica /mnt/musica cifs defaults,user='guest',password='' 0 0
Si usamos el comando mount y nos saliese el mensaje de error:
"tipo de sistema de ficheros 'cifs' desconocido" es probable que nos falte alguno de estos paquetes: smbget y/o samba .
Los instalaremos desde el yast, zypper o apt-get (en caso de otros linux que lo incorporen).
jueves, 9 de febrero de 2012
Backup Zimbra 7 - The easy way - Offline
DURANTE ESTE PROCESO EL SERVICIO DE CORREO NO ESTARÁ DISPONIBLE.
- Solo se respalda zimbra
- En caso de restaurar en otro servidor diferente se requiere saber exactamente que versión fue la que teníamos instalada.
Entrar con el putty o con Vshpere Client a la consola de RedHAT, ingresar como root y el password correspondiente
Para hacer backup rápidos:
1) ver espacio disponible
[root@mail ~]# df
Filesystem 1K-blocks Used Available Use% Mounted on
/dev/mapper/VolGroup00-LogVol00
194895100 25238976 159596348 14% /
/dev/sda1 101086 40543 55324 43% /boot
tmpfs 1956324 0 1956324 0% /dev/shm
#14% en uso
2) Ver el tamaño de la carpeta Zimbra
[root@mail ~]# du -sh /opt/zimbra
8.6G /opt/zimbra
3) Crear una carpeta de backup
[root@mail /]# mkdir /opt/backup
4) Detener Zimbra y Copiar carpeta
[root@mail /]# su -- zimbra
[zimbra@mail /]$ zmcontrol stop
[zimbra@mail /]$ exit
[root@mail /]# cp -Rp /opt/zimbra /opt/backup
5) Comprimir y Renombrar la carpeta del backup con el formato backupyymmdd_HHSS
[root@mail /] tar -cvf /var/tmp/backup20120209_1544.tar /opt/backup/
[root@mail /]# mv /opt/backup.tar /opt/backup20120209_1544.tar
[root@mail /]# rm -rfv /opt/backup/
6) su -- zimbra
[zimbra@mail /]$ zmcontrol start
Una versión de estos comandos están en un video de thejonas.net
Zimbra backups and restore using CentOS - Part 1 of 2
http://www.youtube.com/watch?v=xhUksAhpBxw
Zimbra backups and restore using CentOS - Part 2 of 2
http://www.youtube.com/watch?v=BrHTrXiLU5o
Saludos
BADBOY
- Solo se respalda zimbra
- En caso de restaurar en otro servidor diferente se requiere saber exactamente que versión fue la que teníamos instalada.
Entrar con el putty o con Vshpere Client a la consola de RedHAT, ingresar como root y el password correspondiente
Para hacer backup rápidos:
1) ver espacio disponible
[root@mail ~]# df
Filesystem 1K-blocks Used Available Use% Mounted on
/dev/mapper/VolGroup00-LogVol00
194895100 25238976 159596348 14% /
/dev/sda1 101086 40543 55324 43% /boot
tmpfs 1956324 0 1956324 0% /dev/shm
#14% en uso
2) Ver el tamaño de la carpeta Zimbra
[root@mail ~]# du -sh /opt/zimbra
8.6G /opt/zimbra
3) Crear una carpeta de backup
[root@mail /]# mkdir /opt/backup
4) Detener Zimbra y Copiar carpeta
[root@mail /]# su -- zimbra
[zimbra@mail /]$ zmcontrol stop
[zimbra@mail /]$ exit
[root@mail /]# cp -Rp /opt/zimbra /opt/backup
5) Comprimir y Renombrar la carpeta del backup con el formato backupyymmdd_HHSS
[root@mail /] tar -cvf /var/tmp/backup20120209_1544.tar /opt/backup/
[root@mail /]# mv /opt/backup.tar /opt/backup20120209_1544.tar
[root@mail /]# rm -rfv /opt/backup/
6) su -- zimbra
[zimbra@mail /]$ zmcontrol start
Una versión de estos comandos están en un video de thejonas.net
Zimbra backups and restore using CentOS - Part 1 of 2
http://www.youtube.com/watch?v=xhUksAhpBxw
Zimbra backups and restore using CentOS - Part 2 of 2
http://www.youtube.com/watch?v=BrHTrXiLU5o
Saludos
BADBOY
jueves, 9 de diciembre de 2010
Backup Exchange 2010 Information Store using Windows Backup
Backup Exchange 2010 Information Store using Windows Backup
There seems to be quite a lot of confusion around the ability to backup Exchange 2010 using the built in Windows Backup feature. This stems from the omission of this feature prior to Exchange 2007 service Pack 2
Exchange 2010 includes a plug-in for Windows Server Backup that allows you to perform a backup of the Exchange data using the Volume Shadow Copy Service.
Preparation Tasks
With Windows 2008 R2 and Windows 2008 the Windows Backup feature is not installed by default so we first need to add this feature. To do this launch Server Manager, under Features select Add Feature. Locate the Windows Server Backup Features and put a check box in both options.
Now that the features are installed the plugin needs to be enabled. In the services snapin (start > Run > Services.msc) locate the “Microsoft Exchange Server Extension for Windows Server Backup” set the service to automatic and start it.
Backup the store
From Start > All Programs > Accessories > System Tools select Windows Server Backup
In the task pane select Backup Schedule. When the wizard opens click Next on the first screen and then select either Full Backup if you want to perform a full system backup or Custom if you just want to select the items to be backed up. So if you just want to backup the information store then select Custom. Click Next.
On the following screen click Add Items and browse to the folder your information store files are stored in. By default with Exchange 2010 this is C:\Program Files\Microsoft\Exchange Server\V14\Mailbox there will then be a folder for each store called Mailbox Database (Database reference number)
Once you have selected the Mailbox Databases and have returned to the wizard screen click the Advanced Settings button and under VSS Settings select VSS Full Backup
Configure your schedule and set the destination on the following two screens and select Finish. This will backup your Exchange databases and flush the logs.
Exchange 2010 includes a plug-in for Windows Server Backup that allows you to perform a backup of the Exchange data using the Volume Shadow Copy Service.
Preparation Tasks
With Windows 2008 R2 and Windows 2008 the Windows Backup feature is not installed by default so we first need to add this feature. To do this launch Server Manager, under Features select Add Feature. Locate the Windows Server Backup Features and put a check box in both options.
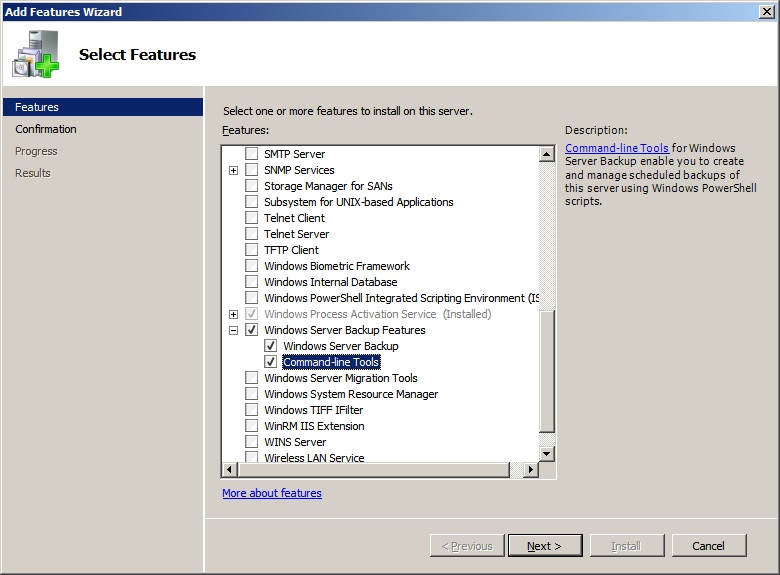
Now that the features are installed the plugin needs to be enabled. In the services snapin (start > Run > Services.msc) locate the “Microsoft Exchange Server Extension for Windows Server Backup” set the service to automatic and start it.
Backup the store
From Start > All Programs > Accessories > System Tools select Windows Server Backup
In the task pane select Backup Schedule. When the wizard opens click Next on the first screen and then select either Full Backup if you want to perform a full system backup or Custom if you just want to select the items to be backed up. So if you just want to backup the information store then select Custom. Click Next.

On the following screen click Add Items and browse to the folder your information store files are stored in. By default with Exchange 2010 this is C:\Program Files\Microsoft\Exchange Server\V14\Mailbox there will then be a folder for each store called Mailbox Database (Database reference number)
Once you have selected the Mailbox Databases and have returned to the wizard screen click the Advanced Settings button and under VSS Settings select VSS Full Backup

Configure your schedule and set the destination on the following two screens and select Finish. This will backup your Exchange databases and flush the logs.
Suscribirse a:
Entradas (Atom)